
Greetings all,
We’ve got something a little different for you today! We love scanning, we love retro tech, and we definitely love seeing the insides of cool gadgets. So what happens when you take an old portable CRT camping TV and give it a sleek, transparent acrylic case? Pure nostalgia meets modern craftsmanship, if I do say so myself.
I found this weird little TV at a local antiques store (god I feel old). It is packed with features—a flashlight, a lantern, a compass, a radio, a siren, and, of course, a tiny black and white cathode-ray tube screen.


For this project, I only wanted the TV itself, stripping away all the extra bells and whistles.
Here’s how the build went:
Step 1: Disassembly & Planning
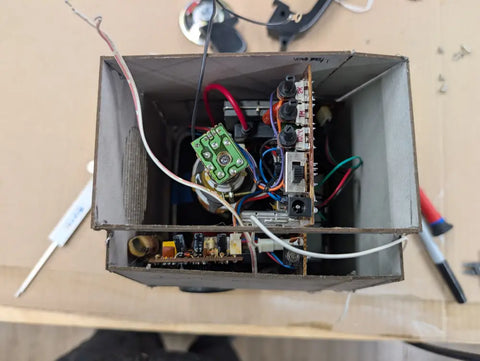
Taking apart vintage electronics is always a mix of excitement and mild panic—who knows what surprises lurk inside decades-old plastic shells? The internals of this TV were, well… messy but beautiful. Two old PCBs connected by a floppy metal bracket, a tangle of wires, and the ever-iconic vacuum tube CRT made up the guts of this machine.


It wasn’t going to be easy to measure this chaos manually. With flexible wires, organic shapes, and a lot of interconnected components, it was nearly impossible to get proper dimensions by hand.
That’s where our trusty THREE scanner came in.
Step 2: Scanning the Original Case
Since the internal components couldn’t be scanned accurately, the best approach was to scan the original case and work from there. The problem? The front half of the case was a very shiny green plastic, which scanners tend to hate.

No problem! A little scanning hack: Instead of using expensive sublimating sprays, I went for my favorite DIY solution—talcum powder mixed with isopropyl alcohol. A fine mister spray bottle with a 2:1 IPA-to-powder ratio did the trick. Lightly misted, followed by a quick dry with a heat gun on low, and boom—matte, scannable surface!


Using the THREE and its turntable, I captured the case in about 15 minutes, focusing heavily on the interior geometry since that’s where the mounting points would come from.


Step 3: CAD Time!
With the scan complete, it was time to move into CAD modeling. I opted for laser-cut acrylic as the material of choice—because if we’re going for transparency, we might as well go all in! FDM printing was out (not clear enough), and sending it out for professional fabrication was too expensive and time consuming.
Importing the scan into SolidWorks, however, wasn’t smooth sailing. High-poly models can be a nightmare, so I used the Merge feature in THREE to generate a lower-poly version. Once that was in place, I built planes relative to the original mounting points and sketched out the structure from there.


Before committing to acrylic, I did a quick prototype using pressed card and hot glue. Good thing, too—it revealed a few alignment issues that needed tweaking!


Step 4: Laser Cutting & Engraving Details
Once the CAD model was finalized, it was time for the real deal. Laser-cut acrylic panels slotted together perfectly, and for that extra nostalgic touch, I recreated the original decals and used the laser’s engraving feature to etch them into the final design.

Assembly was simple—just a bit of careful fitting, some screws, and a whole lot of admiration for how good this thing looked.


Step 5: Testing—Does It Even Work?
Now came the real question: Would the TV even function? This turned out to be its own adventure. Since Canada no longer broadcasts UHF, VHF, or VL signals, I had to get creative. The solution? An old NES and an RF adapter to simulate an old-school TV signal. And guess what? It worked like a charm!

The Final Result
A crystal-clear window into retro tech—literally! Seeing the CRT tube in action through the acrylic shell was mesmerizing. The glowing phosphors, the high-voltage electronics, the satisfying hum of a well-aged vacuum tube—it was everything I hoped for.
This was a super fun project, and it really shows how 3D scanning can make seemingly impossible tasks way easier.
Have a retro tech project of your own? Share it with us on the Matter and Form Forum!
Happy scanning! 🚀